A whimsical place to play, where paper and ink become one.

Thursday, September 19, 2019

Some Odd Girl ~ Butterfly Friend Fairy

Hello Friends,

I have a super fun card to share with all of you today. I am using the Butterfly Friend Fairy stamp by Some Odd Girl. She was such fun to color!


For the background I used fun stencils and stamps by Crafter's Companion to create this fairy scene. I love how the branch part of the stencil turned out. I inked it completely with light brown ink to begin then I gently touched a darker brown ink in various areas of the stamp to make it look more realistic. It was quite fun!


Here is a close up showing my coloring. I colored her with Copic markers.


One last look.... Do you belong to our Some Odd Girl Community over on Facebook? If not CLICK on over and join us for daily inspiration.

Until next time my friends... Hugs, Melanie


Tuesday, September 10, 2019

Some Odd Girl ~ Lounge Fairy

Hello Friends,

I almost missed my important Tuesday post for Some Odd Girl ;-) I had such fun coloring this digital image. Everyone knows how much I love Fairies. So had to use Lounge Fairy in a project. Lets take a look...


 I colored this darling fairy with Spectrum Noir Alcohol markers. The shape of my card came from a Crafter's Companion Die set that I purchased from HSN. The dies and papers are also Crafter's Companion and the paper flowers are from my stash. Here is a close up of this awesome digital stamp all colored up...


You cannot tell by the photo but I used some sparkle pen in yellow on her wings. 

Have you used Digital images before? If not Some Odd Girl has a "Getting Started with Digital Images" free download. Simply click HERE to view that. 

Some Odd Girl also has a Coloring Club. This month we are learning all about coloring wood. Check it out!!! 

Thank you for stopping by to check out my newest post. Would you like to follow my work? Simply sign up along the side of my blog by entering your email. Until next time... happy coloring!

Melanie

Sunday, September 8, 2019

LDRS Creative ~ Nuts About You!

Hi Friends,

Welcome back! Thank you for visiting us today.
I have a fun fall card for you all today. This was made using the "Nuts About You" Stamp set by LDRS Creative.

For this project I have stamped watercolor paper with our LDRS Hybrid Ink Pad in Raven. Then I colored these adorable stamps with watercolor pencils. Here is a close up of the coloring.


I am brand new at water coloring so this was a labor of love for sure. I loved learning to blend the leaves especially with yellow, orange, and red. Aren't fall colors beautiful?

LDRS Creative Supply List:
 
One last look at my card. I hope you have been inspired today.

Have a wonderful week everyone. Hugs, Melanie

Wednesday, September 4, 2019

Crafter's Companion ~ Poinsettia Perfection Collection

Hi Friends,

Over the last couple days I have had a bunch of fun with some of my new Crafter's Companion goodies.  Here is the final result from my efforts...


 Crafter's Companion Supply List:

Centura Pearl Card in Pistachio and Cherry (both available on their website).

This fun shaped card was created by using the largest background die from the Crafter's Companion Poinsettia Perfection Collection. The Victorian Frame die is  4.1 x 6.1" and I just love the look of the shaped card. Because I used this die to create the shape I was unable to mat and layer like I enjoy doing so using the Harmony Quick Dry Ink Pad I simply darkened the edges of the base card to give the card that layered look. 
The detailed die from the Victorian Frame die set was cut from the Pistachio Centura Pearl card. One pass through my Gemini Junior and all the little pieces popped out with ease. I didn't even need the metal shim which is awesome. 


 These foam flowers were cut using the Poinsettia die from the collection along with Crafter's Companion craft foam. This foam is heated and shaped to create stunning depth and dimension. Everything needed to create flowers like these can be found in your Foam Flower kit by Crafter's Companion. Here is a close up of one of those flowers.


One last look...I hope I have inspired you today to get out some of your wonderful crafty items and create something beautiful.

Hugs, Melanie

Tuesday, September 3, 2019

Some Odd Girl ~ Spirit of Autumn

Hello My Oddie Friends,

Today I am here to share with you a framed piece of art that I hand colored. The moment I set my eyes on this beautiful digital image I knew I had to color it. But it almost felt like it needed a little more attention than just a card. So I decided to resize it to a 5x7" so that I could frame her.


This is the Spirit Of Autumn, and she can be downloaded from the Some Odd Girl Online Store. Here is the finished project all framed and ready to display. I have to admit this was a challenging piece but I have always loved a challenge. I knew I wanted her leaves to have all the beautiful colors of fall and with her in a full length dressed I decided to color it a royal purple. Such a striking color contrast.

Here is a close up of my coloring...


I have used Copic markers with this digital image. 
Want to download her? simply CLICK HERE! 
Hugs, Melanie 

Sunday, September 1, 2019

LDRS Creative ~ Polkadoodles Stamp & Cut Blooming Bugs

Hello Friends,
Welcome back to Fairy Stamp Land. Today I have a LDRS Creative card to share with all of you.

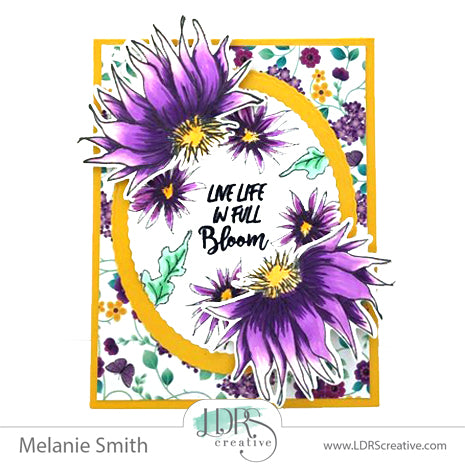
Using the Polkadoodle's Woodland Foliage Frames I die cut a white piece of card using the smaller oval die. This piece is to stamp on. Then I used the slightly larger oval die to cut a piece of coordinating card stock to frame the stamped piece nicely. With the Polkadoodle's Stamp N Cut Blooming Bugs stamp and die set I stamped the white oval with the smaller floral using LDRS Hybrid Ink in Raven. On scraps of paper I also stamped and die cut the larger florals to layer on top for added dimension and interest. 


Here is a close up look at the coloring (I used Alcohol Markers) and the focal sentiment. This "Live Life In Full Bloom" sentiment is from the Polkadoodle's Spring Chicken stamp set. I Stamped it in LDRS Watermark Ink and heat embossed it using black embossing powder. The sentiment is perfect with this gorgeous floral card.
 
I just love this color scheme. It is so vibrant and cheerful. Make sure to live your life in Full Bloom!!!! Till next time, Melanie

Friday, August 30, 2019

Crafter's Companion Subscription Box 6 ~ Creating a Watercolor Background

Hello There,

For all of you who enjoy following my blog I want to thank you personally. I put a piece of my heart into each piece I make and I appreciate you following my work.

Today I have something a little different. I was challenged by a fellow crafter to open any Crafter's Companion subscription box and to create a card a week. The Crafter's Companion Subscription box is a monthly box that can be ordered off of HSN. It is an auto ship club. Each box is focused on learning a new technique. This is a project from Box 6, Aqua Markers.


Here is a photo showing Subscription Box 6 along with the first card I have made using this kit. Just to give you an idea of the value in these subscription boxes, this box came with 3 Spectrum Noir Aqua Markers in primary colors to allow for blending to create other colors. 4 STAMP SETS.... that is right 4 OF THEM! The box also includes card bases in 3 sizes, 9x9" colored card, 9x9" watercolor card, and all the envelopes in all 3 sizes. It is a tremendous value.


 Here is a close up of my card. When your a subscriber you get a club Facebook group along with multiple tutorial videos to support the learning of each technique. For this card I used the 
 "Splauging Technique" (Sara's Term). Below I will share Step by Step directions on how to create this background technique.
 
To create the background just follow these step by step directions:
 
1. Using a floral and foiliage stamp from your sub box kit 6 stamp onto watercolor paper using the Spectrum Noir Watermark ink pad. 
 
2.  Once stamped cover with white embossing powder and heat set.
 
3.  Onto a glass mat scribble some of your Spectrum Noir Aqua markers onto the mat. This forms your color palet. For my example here I chose the Rose Pink and Fisherking Blue Aqua markers that were included in the sub box 6. when these mix together it gives you a purple hue.
 
4.  Now with your moist paint brush pick up color and smoosh ink in splotches all over your watercolor card. Do this with the Rose Pink, then the Fisherking Blue, and finally mix the two colors on your glass mat to form a purple color and fill in the open spaces with this newly created color. 
 
The heat embossed stamping will resist the water colors added. For the sentiment, I heat embossed the sentiment from one of the stamp sets in Sub Box 6 with black embossing powder. Then using the same water color technique I colored the background. Lastly I used the Die'sire Parisian Mirror set to die cut the sentiment. 
 
Crafter's Companion Supply List: 


Subscription Box 6 which is still available on the Crafter's Companion Website HERE

Die'Sire Parisian Mirror Classiques Die for the shaped sentiment 

Die'Sire Decorative Edge Set 2 dies for the border across the middle  

Spectrum Noir Finesse Water-proof Dye Ink in Noir Black for the butterflies 

Spectrum Noir Watermark Translucent Ink


Crafter's Companion Black and Clear embossing powders 

Spectrum Noir Sparkle Pen in clear on the butterflies and flowers


I hope you have enjoyed todays project and that it inspires you to play with ytour crafty products instead of letting them collect dust on the shelf. Have a Creative Weekend!!! Melanie