A whimsical place to play, where paper and ink become one.
Showing posts with label Fairystampland. Show all posts

Wednesday, September 4, 2019

Crafter's Companion ~ Poinsettia Perfection Collection

Hi Friends,

Over the last couple days I have had a bunch of fun with some of my new Crafter's Companion goodies.  Here is the final result from my efforts...


 Crafter's Companion Supply List:

Centura Pearl Card in Pistachio and Cherry (both available on their website).

This fun shaped card was created by using the largest background die from the Crafter's Companion Poinsettia Perfection Collection. The Victorian Frame die is  4.1 x 6.1" and I just love the look of the shaped card. Because I used this die to create the shape I was unable to mat and layer like I enjoy doing so using the Harmony Quick Dry Ink Pad I simply darkened the edges of the base card to give the card that layered look. 
The detailed die from the Victorian Frame die set was cut from the Pistachio Centura Pearl card. One pass through my Gemini Junior and all the little pieces popped out with ease. I didn't even need the metal shim which is awesome. 


 These foam flowers were cut using the Poinsettia die from the collection along with Crafter's Companion craft foam. This foam is heated and shaped to create stunning depth and dimension. Everything needed to create flowers like these can be found in your Foam Flower kit by Crafter's Companion. Here is a close up of one of those flowers.


One last look...I hope I have inspired you today to get out some of your wonderful crafty items and create something beautiful.

Hugs, Melanie

Wednesday, October 3, 2018

Tinsley by LDRS Creative ~ 1 Easy Designers Tip


Hi Friends,
I would love to share a fun project I created using the fairy stamp named "Tinsley"By LDRS Creative


This beautiful stamp is shown on the website as a holiday fairy (see below). But I decided to grab some stunning paper that we sell and have a little fun with Ms. Tinsley!!

Who says she has to be a holiday fairy??? I first decided to coordinate my project all to match the Sincerely Yours 6x6" paper pad. It came out quite striking! The sentiment came from our New Beginnings Stamp Set.

As I was using the Woodland Foliage Frames die set I  die cut my stamped image with the larger of the two oval dies which did not give me a frame to add behind it

Designers TIP: Simply trace your die around the outside of the die using a ball point pen. Then simply fussy cut it out. Quick and easy tip that really allows you even more versatility when using your favorite dies.


After using foam tape to pop up the oval layers I then cut two of the foliage branches from the same dies set and glued a nice grouping flowers around one side to finish assembly. Lastly I added glitter glue to the fairy wings. Here is a last look of my creation.


My goal today was to inspire your creative side. I hope I have accomplished that. LIKE MY WORK? leave your EMAIL along the side bar to get notified each time I post a new project. Thanks so much for stopping by today! Happy crafting!
Melanie

Saturday, August 18, 2018

LDRS Creative ~ Inlaid Sunburst Rainbow Card

Hi Friends,
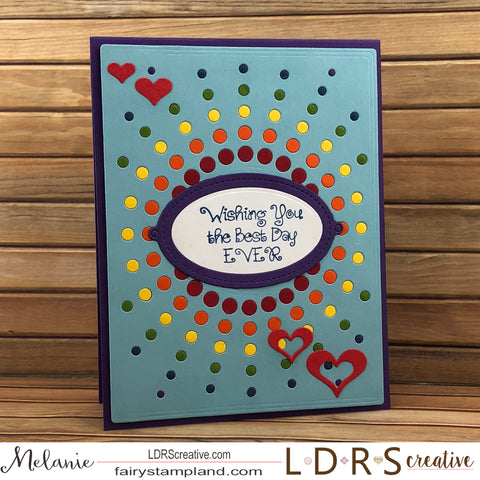
DT Melanie here with you today to share a fun inlaid card using our NEW Sunburst Rectangle Die Set.

This was so much fun to create. Here is how I did it!

Step 1: Cut a piece of light blue card stock (4"x5.25") using the starburst die. Your base card will also need to be cut from a dark purple card stock (4.25x11") 

Step 2: Add double sided foam tape to the entire back of the light blue card stock. I did this for two reasons... 1.) I wanted the small pieces to attach without using glue. and 2.) I wanted to add a little extra thickness to the card since it was going to be quite flat.

Step 3. Start with the red card stock and simply die cut it using the same star burst die and take the largest "circles" and lay them into the holes of the die and simply press to adhere them. Do this with each color of paper, completing one color at a time before die cutting the next one.

Step 4: When cutting each starburst you will accumulate the circles from the center of the die. Glue these all together and glue to center of the card. This will give a little more stability when gluing the sentiment pieces onto the card.

Step 5: Using the Scalloped Rectangle Die Set, cut the tag die from both purple and white card stocks. 

Step 6: Stamp your sentiment using Hybrid Ink in Dark Washed Jeans. I have used a sentiment from the "Wishing You" sentiment stamp set.

Step 7: Glue sentiment over the center opening. 

Step 8: Die cut the small hearts from a red card stock and adhere.


I hope this little inlaid card has brightened your day. I hope you have the
"Best Day Ever" Hugs, Melanie

Saturday, August 4, 2018

LDRS Creative Lemonade ~ I Could Just Squeeze You!

Hi Friends,
Welcome back! I am here with you today to share a really bright and cheerful card.


This adorable stamp set is simply called "Lemonade" and is a fun little 4x4 stamp set. I have used a bunch of NEW dies from the LDRS Creative Online Store.


LDRS Creative supplies used:


As you can see from this close up photo, I have gotten a lot of dimension by adding lots of foam tape under some of the dies. The background was also stamped with the lemon stamp from the Lemonade stamp set. It almost gives it a designer paper look. 


One last look.... I hope I have brought a smile to your face today and that you make time for yourself this week and enjoy some crafty time! Hugs, Melanie

Saturday, May 19, 2018

LDRS Creative Masking Technique ~ Puppy Time

Hello Friends,
Welcome back friends! Today I have a super easy project using the  LDRS Creative Stamping Mask Paper along with the Puppy Time Stamp Set.


As soon as I saw these adorable puppies I immediately thought of using them for a masking technique. This stamp set also INCLUDES the coordinating dies so you get more bang for your buck!

Here is my finished card. These puppies are so adorable. When you mask stamps like this the final result looks as if it was one stamp. It even tricked my husband. Let me show you how easy it really is to do.

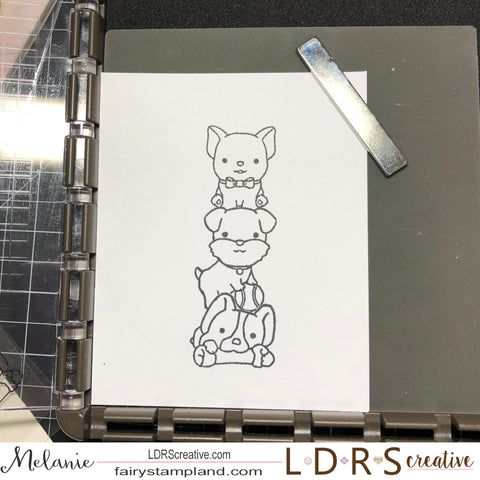
Step 1: For this project I used a positioning tool for easier placement but because these are clear stamps it really isn't necessary. I have stamped the bottom dog onto my white card stock (on the right) and then I stamped it again on masking paper ( on left). Fussy cut the masking tape image.


Step 2: In this photo I am placing the "mask" that I fussy cut from the masking paper and I am sticking it down over the stamped image on the card stock.


Step 3: Stamp your second image right on top of the bottom image. When you peel away the masking tape you will see the magic begin to emerge.


Step 4: Next use the masking paper again to mask off the puppy's head so we can stamp the top puppy.


Step 5: Remove the masking paper.


Step 6: Now your little guys are ready to color :-)


Here is a close up of the coloring.  I have also used the Dewdrop Border Die
in the background.


I hope you have enjoyed today's post. To see more of my work feel free to visit my personal blog.

Friday, December 22, 2017

Little Darlings Tinsley ~ A Fairy Christmas Card

Welcome back friends,
For today's post I have colored up "Tinsley" everyone knows how I love fairies....but this is even better.... its a fairy stamp AND She is on sale in the Little Darlings ONLINE STORE so don't wait on this....


In this project I have used the beautiful Polkadoodles 6x6" Winter Land paper pack
along with a few embellishments from Stampin' Up!


The stamp was colored with Copic markers in the following colors:
E000, E00, E11, E21, E41, E43, E44, E84, E87
B41, B91, B93, B95, B97, B99
C2, C4, C6, & R20


Thank you for stopping by today. We would love for you to visit the Little Darlings online store. Don't forget this stamp is on sale currently and we have a bunch of clearance stamps AND dies also available. This is the best time to shop ;-)

Don't forget to make time for your crafty side some time soon. It is good for your inner peace even when life isn't always peaceful. Love, Melanie