A whimsical place to play, where paper and ink become one.

Wednesday, December 28, 2022

Heartfelt Creations ~ A Floral Delivery

Hi Friends,

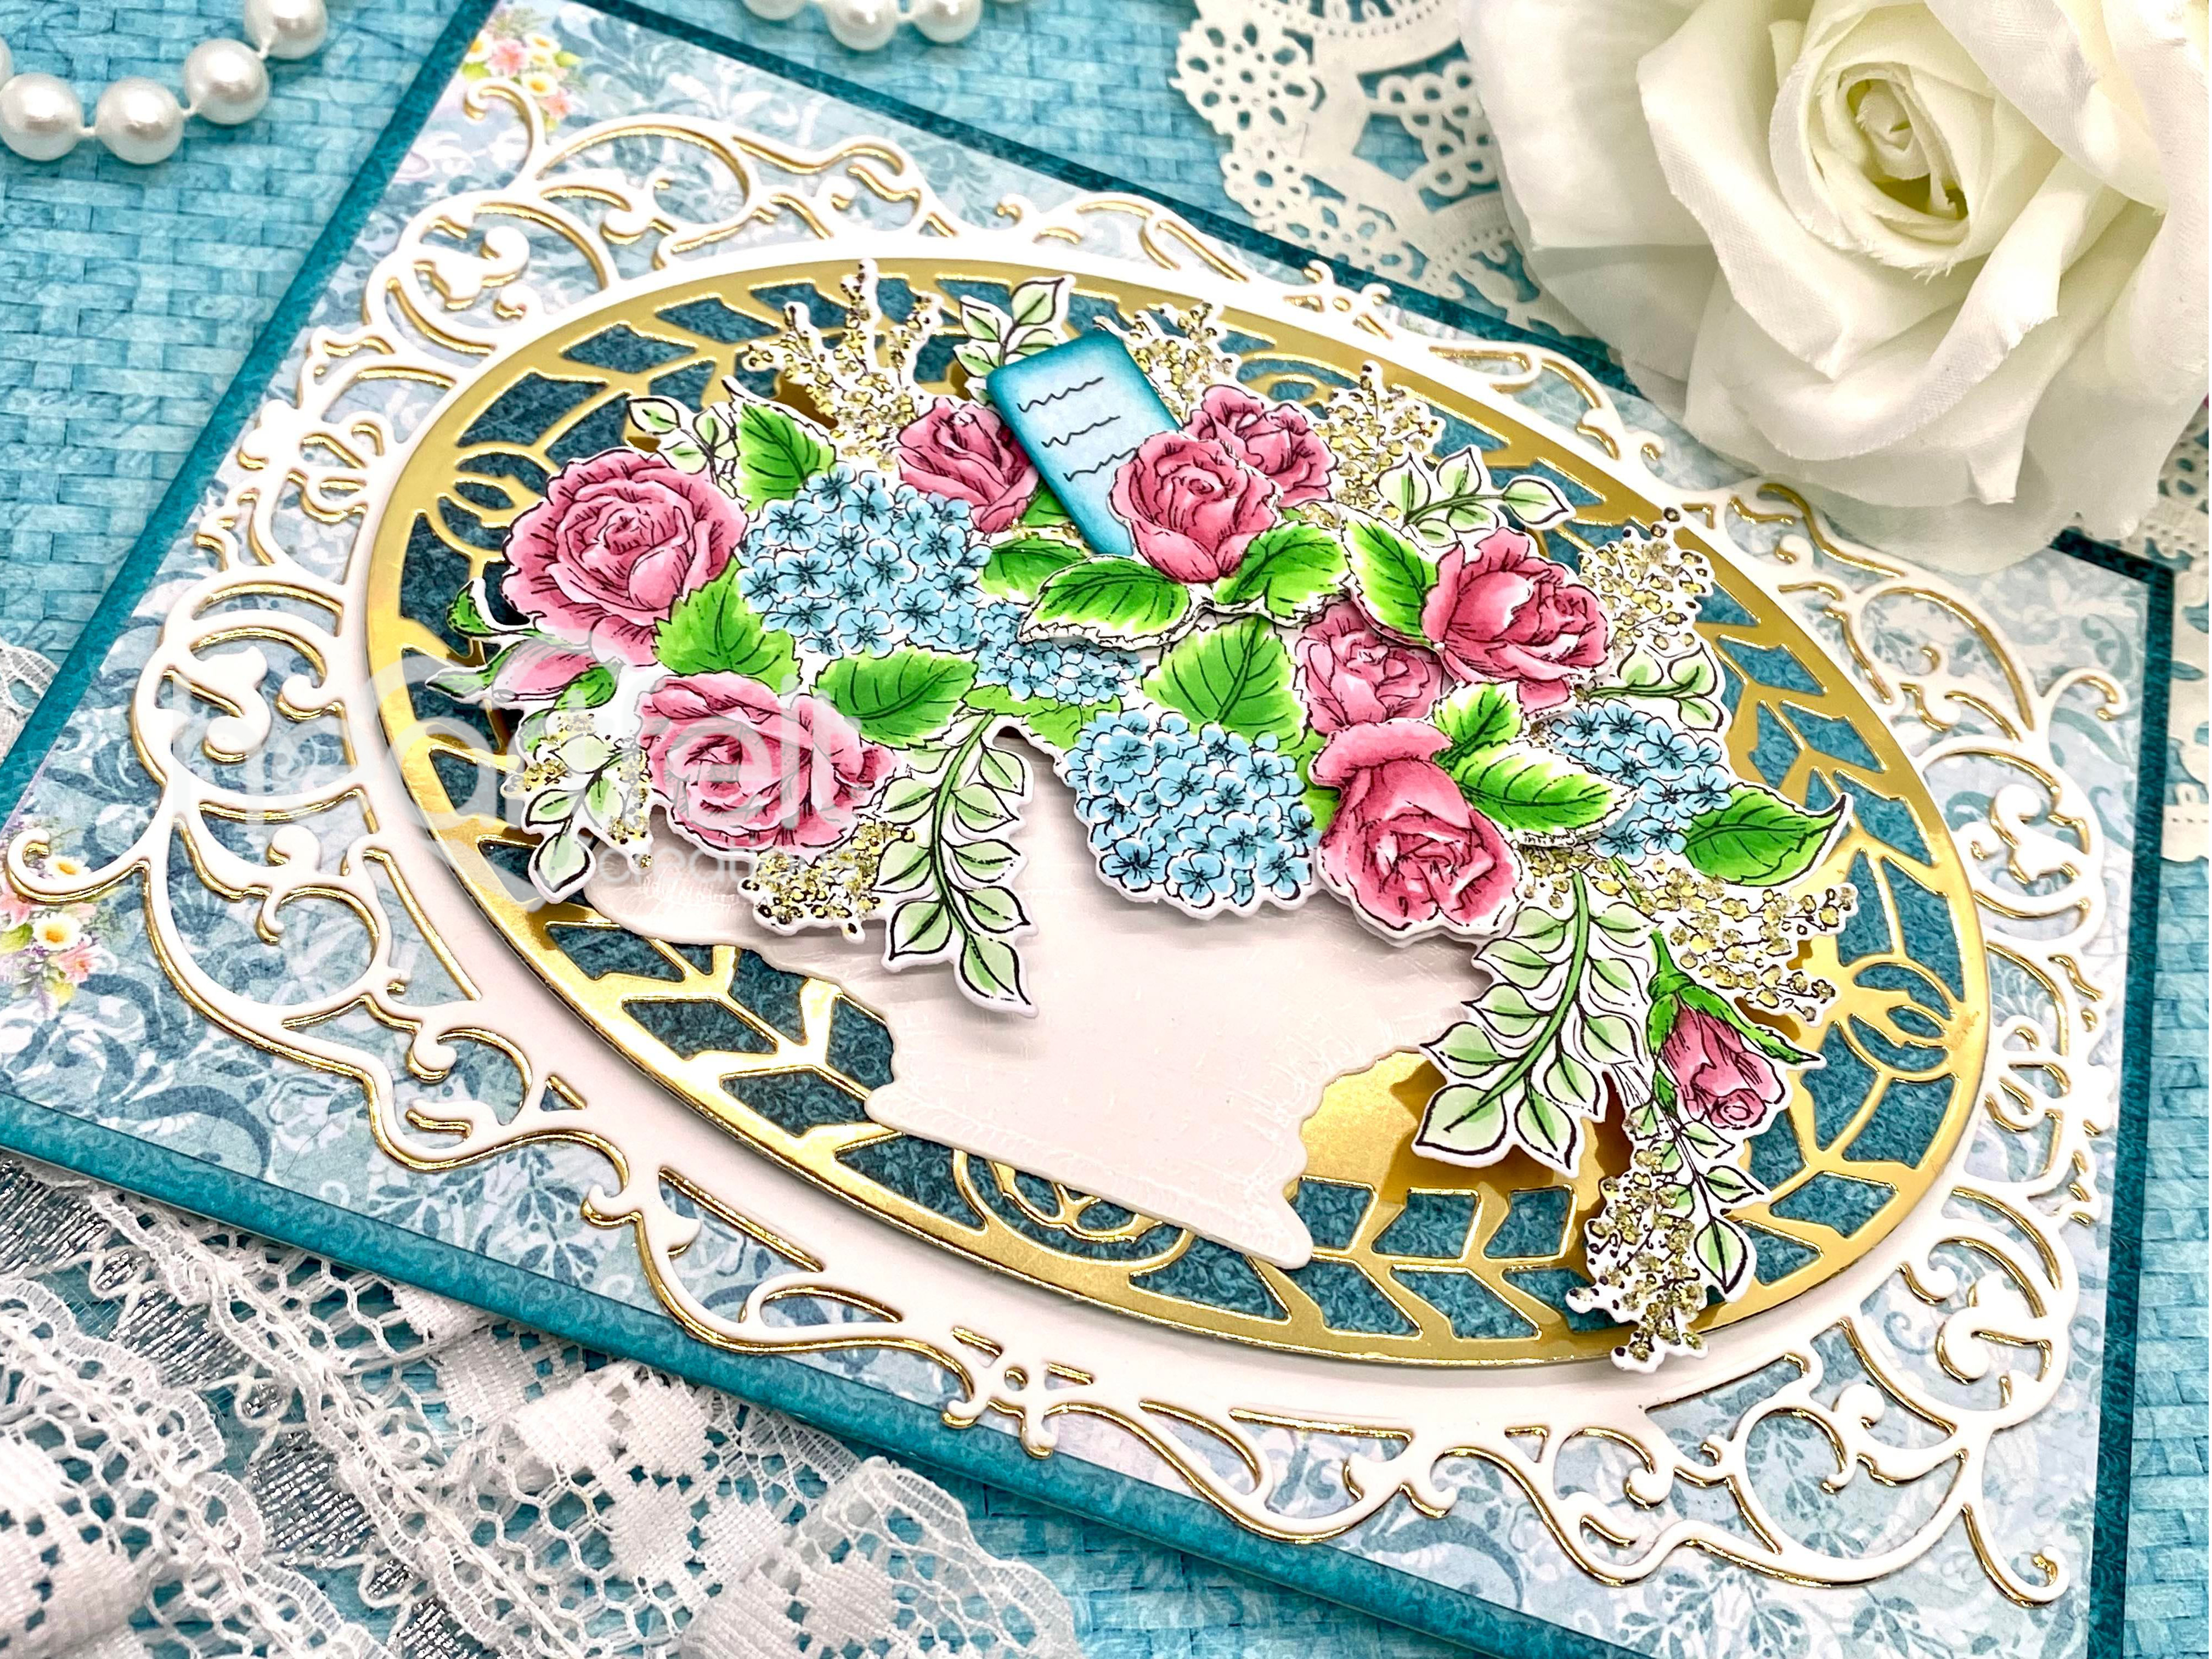
Today I have a elegant card featuring the Floral Basket Collection by Heartfelt Creations. I have combined two beautiful die sets to create a lovely back drop for this bouquet using the Simply Classic Oval Frame and the Oval Filigree Die sets. I have also added a sweet note card as if this bouquet was just delivered from a florist shoppe. I am sure the recipient felt truly special receiving such a big basket of flowers.



Directions:

Cut a piece of white cardstock to 10 1/2” x 7 1/4” and score at 5 1/4” to create the card base. From the HCDP1-2146 Floral Basket Paper Collection cut a piece measuring 5 1/4” x 7 1/4” from sheet 8B and ink the edges with Paradise Teal Archival Ink using the HCDA1-449 Stack and Store Daubers. Once inked attach to the card front. Now cut a piece from sheet 1B measuring 5 x 7” and adhere to the card front. Using the largest die from the HCD2-7426 Oval Filigree Frame Die set, cut one from white cardstock and one from Luxe Gold Cardstock and glue the white on top of the gold ,slightly offset to create a two tone effect. Adhere this layer to the card front. Using the 3rd and 4th largest dies from the HCD2-7382 Simply Classic Oval Frame die set cut a decorative oval piece of Luxe Gold Cardstock. Next using the same outer die along with the smaller oval die cut a solid piece of teal paper (sheet 8B) to layer beneath. Glue these two layers together and attach to the center of the card using 3D foam dots.

Stamp the basket and handle from the HCPC-31008 Wicker Basket Cling Stamp Set with Versa Color White ink onto white cardstock and heat emboss with white embossing powder. Die cut with coordinating dies. Stamp the large floral bouquet from the HCPC-31009 Basket Florals Cling Stamp Set 2x onto Copic X-Press It paper with Memento Tuxedo Black Ink.  Color one fully with Copic markers. Color the second one partially where the small coordinating die matches. Once colored die cut with the coordinating die set. Add dots of Dries Clear Glue to the small yellow filler flowers and sprinkle with Clementine Ultra Fine Transparent Glitter.

Glue to white basket to the center oval on the card base. Using Double Dots 3D Foam Circles add the flowers to the top of the basket then add the extra flowers on top using 3D foam dots leaving room for the tag to be tucked under. To make the tag simply use the HCD1-7202 Album Tags and Accents and cut the smallest tag from a pale blue scrap of paper and using a Black Artliner add little written lines to the tag. Then ink the edges using the Paradise Teal ink. Using 3D foam dots attach the tag upside down making it look like a note card sticking out of the top of the flower bouquet. Finish the inside of the card as desired.

I hope you enjoyed that as much as I enjoyed creating it for each of you! Check out my personal project in the Heartfelt Creations Gallery to find out what products I used for this project.

Also, please be sure to visit the Heartfelt Creations Blog to see all of the gorgeous projects created by the other amazing design team members.


Love, Melanie


Wednesday, December 21, 2022

Heartfelt Creations - Classic Blooms

Hi Friends,

Today I have my second card featuring the iconic Floral Basket Collection by Heartfelt Creations. You all are going to want this collection in your crafty stash for sure. These perfectly sized baskets are just amazingly fun to work with. Today I have made a shaped card using one of my favorite dies, the Fancy Classic Rectangle die. This die is perfect with its vines framing the beautiful basket of flowers. Lets take a look...


Directions:

Cut a piece of white cardstock to 5 1/4” x 8 1/4” and score at 1” along the 8 1/4” side to form a
1” flap. Using the largest die from the HCD2-7384 Fancy Classic Rectangle Frame die set cut this piece with the die slightly over the top fold line so that the score line is preserved. Now using the same die, cut 2x from white cardstock. Attach one to the flap to form a card base. Make sure the flap is to the inside of the card base so that it can be covered when finishing the inside of the card. Trim the top of the card to match along the top so it opens easily. Now to complete the card front simply attach the third cut piece to the front of the card which will make the top of the card look complete and will strengthen the card overall. Using that same die from the Fancy Classic Rectangle die set, cut a piece from HCDP1-2146 Floral Basket Paper Collection, sheet 7B. Using the HCDA1-449 Stack and Store Daubers, Ink the edges using Paradise Teal Archival Ink and glue to the card front. Next using the second largest die from the same set cut 2 pieces, one from sheet 10B, and another from Luxe Gold Cardstock. Layer the green on top of the gold and offset a little to create a two tone look. Attach to the card front. Using the same die, cut a pink piece from HCDP1-2133 Floral Banners Collection Paper Pad, Sheet 12B. Insert the center section into the green and gold frame. Using the HCD1-7157 Eyelet Oval and Basics Large die set, cut one scallop oval from Luxe Gold Cardstock. Using HCD1-7156 Eyelet Oval and Basics Small die set, cut a piece from sheet 2B of the Floral Basket Paper Collection. Layer these two ovals and attach to the card front using 3D foam dots.

Stamp the basket and handle from the HCPC-31008 Wicker Basket Cling Stamp Set with Versa Color White ink onto white cardstock and heat emboss with white embossing powder. Die cut with coordinating dies. Stamp the flowers from the HCPC-31010 Basket Blooms Cling Stamp Set onto Copic X-Press It Paper with Memento Tuxedo Black Ink and color with Copic markers. Die cut with coordinating dies. Add dots of Dries Clear Glue to the small yellow filler flowers and sprinkle with Clementine Ultra Fine Transparent Glitter.

Glue to white basket to the center oval on the card front. Glue the underneath of the handle down to the background paper. Using 3D foam dots add the flowers to the top of the basket then glue down the front part of the handle on top of the flowers. Add a coordinating bow to the handle. Finish the inside of the card as desired.

I hope you enjoyed that as much as I enjoyed creating it for each of you! Check out my personal project in the Heartfelt Creations Gallery to find out what products I used for this project.

Also, please be sure to visit the Heartfelt Creations Blog to see all of the gorgeous projects created by the other amazing design team members.


Love, Melanie


Wednesday, December 14, 2022

Heartfelt Creations ~ Floral Basket Collection

 Hi Friends,

So excited to share this month's NEW RELEASE from Heartfelt Creations. This is the Floral Basket Collection and it is amazing to design with. It gives you so many options with two perfectly sized baskets for your different sized cards. Just imagine all the floral bouquets that will be in your future!!! Lets take a look at the first one I have made with the full collection.


Directions:

To create the 6 1/2” card base : Cut a piece of white card stock to 6 1/2” x 8 1/2: and score at 2” along the 8 1/2” side forming a 2” flap. Cut a second piece of white cardstock to 6 1/2” x 6 1/2” square and glue to the outside of the 2” flap so that the seam is inside of the 6 1/2” card base that is being created. Cut a 6 1/2” x 6 1/2” piece from sheet 7B of the HCDP1-2146 Floral Basket Paper Collection 2x and ink the edges of both pieces with HCDA1-449 Stack and Store Daubers and Paradise Teal Archival Ink. Open the card base and with the seam of the card on the bottom inside, cover the seam with one of the inked panels. Attach the other to the card front. Next cut a Luxe Gold piece of cardstock to 6 1/4” x 6 1/4” and adhere to the card front. Then cut a piece of white cardstock to 6 1/8” x 6 1/8” and glue to the card front. Lastly cut a decorative 6’ x 6” panel from sheet 10A from the Floral Basket Paper Collection and add it to the card front. With HCD2-7424 Rectangle Filigree Frame Die cut  2 of the second largest frames, one from white cardstock and one from Luxe Gold Cardstock. Adhere the white on top of the gold using Dries Clear Adhesive slightly offsetting them to create a lovely two tone look. Then using the third largest die from this set cut a piece of patterned paper from sheet 7B and attach to the previously cut two dies with 3D foam dots. Glue this layered frame to the card base centered in the middle as shown.

Stamp the basket and handle from the HCPC-31008 Wicker Basket Cling Stamp Set with Versa Color White ink onto white cardstock and heat emboss with an aqua colored embossing powder. Then die cut using the coordinating die set. Stamp all flower stems from the HCPC-31009 Basket Florals Cling Stamp Set and the HCPC-31010 Basket Blooms Cling Stamp Set onto Copic X-Press It Paper with Memento Tuxedo Black Ink and color with Copic markers. Die cut with coordinating dies. Stamp HCD1-7193 Leafy Accents in Leaf Green Archival Ink onto white cardstock and color lightly with Vivid Chartreuse ink with a blending sponge then after die cutting with the coordinating die, darken the edges with Leaf Green ink. Lastly stamp the bow stamp from the Wicker Basket Cling Stamp set onto pink paper using Magenta Hue Archival Ink. Die cut and lightly darken the edges with the same ink. Add a gold gem to the bow for added detail.

To arrange the floral bouquet first glue down the basket along the bottom and sides only. Also glue down just the back part of the handle to hold it in place.  Slowly add the leaves and flowers one at a time until the basket is at the desired fullness. Use 3D foam dots and Dries Clear Glue for different varieties of depth. Once finished with the arrangement, glue down the front handle and attach bow to finish off the basket. Add Dries Clear Glue to the leaves and sprinkle with Crystal Ultra Fine Transparent Glitter. Finish the inside as desired. 

I hope you enjoyed that as much as I enjoyed creating it for each of you! Check out my personal project in the Heartfelt Creations Gallery to find out what products I used for this project.

Also, please be sure to visit the Heartfelt Creations Blog to see all of the gorgeous projects created by the other amazing design team members.


Love, Melanie


Wednesday, December 7, 2022

Heartfelt Creations ~ Garden Oasis

 Hi Friends,

Today I have a sweet little card for you featuring a beautiful older collection from Heartfelt Creations but one I have never played with before. Can you believe that? I have collections I have never played with? So it is my goal going into the New Year to make sure I play with all my HFC sets!!! I am going to make a list of those I have not yet used and make sure I create with all of them. So here I am starting a bit early. This is the Cottage Garden Collection featuring the beautiful Hydrangea Florals.


Directions:
  
Cut a piece of white card stock to 7 x 10” and score in half at 5”. Using the blue striped paper from the HCDP1-2111 Cottage Garden Paper Collection, cut a piece measuring 5 x 7” Ink the edges using the HCDA1-449 Stack and Store Daubers along with Periwinkle Archival Ink. Attach to the card front. Next using the HCD2-7424 Rectangle Filigree Frame Die, cut out 3 pieces from the largest die in this set. One from white card stock, one from Luxe Silver Cardstock, and one from a scene from the Cottage Garden Paper Pack. With Dries Clear Adhesive adhere together the white and silver outer die cuts together, slightly offsetting them to form a two layer frame. Glue the frame to the card front. From the patterned paper die cut, discard the outer layer and use the center scene to glue into the frame on the card front as shown.

Stamp the smallest flower 4x from the HCPC-3900 Cottage Garden Hydrangea Cling Stamp Set with Periwinkle ink onto Deluxe Flower Shaping Paper. Color the centers with Periwinkle and the petals with a light touch of Deep Purple Archival Ink. Then after die cutting with the coordinating die, deepen the edges with Periwinkle ink. Shape using the coordinating 3D Mold. Next stamp the branch without swirls from the HCD1-7193 Leafy Accents 2x with Leaf Green Archival Ink onto Deluxe Flower Shaping Paper. Lightly color with Vivid Chartreuse Archival Ink. After die cutting with the coordinating dies, darken the edges with Leaf Green ink before shaping with the coordinating 3D Shaping Molds. To finish the Hydrangeas simply add a single HCS1-457-1 Pastel Pearl Stamen - Small in white. Top Tip: Cut thread stamen in half and thread threw just one single side and adhere with a glue gun on the reverse side for the simple single stamen look.

To complete the card simply arrange the leafy accents in the best way to frame the scene that was chosen from the paper pack, any scene can be used. Then attach the individual hydrangea blooms (with a glue gun) one at a time over the leafy accents clustered close together until the desired look is achieved. For the inside of this card the second largest die from the Rectangle Filigree Frame Die set was used which completed the card perfectly. 


  I hope you enjoyed that as much as I enjoyed creating it for each of you! Check out my personal project in the Heartfelt Creations Gallery to find out what products I used for this project.

Also, please be sure to visit the Heartfelt Creations Blog to see all of the gorgeous projects created by the other amazing design team members.


Love, Melanie


Wednesday, November 30, 2022

Cyber Monday Special ~ Holiday Lattice Slimline

Hi Friends,

Welcome back to Inspiration Wednesday with Heartfelt Creations! Today I have a special treat for you. This special edition called the "Slim Star Lattice Rectangle Die is this years Cyber Monday special and is ONLY available while supplies last. It was just released this past Monday and I hope by the time this post goes live there is still dies available for everyone. This was such a treat to work with and I hope all of my friends get a chance to as well. It made for a fun quick and easy card since I had some left over flowers on my desk.... I just added some pearl stamens and fun leaves and here is what I have to share....


Directions:

Cut a piece of white card stock to 8 x 9” and score in half at 4”. Cut sheet 7B from the HCDP1-2129 Festive Poinsettia Paper Collection to 4 x 9” and attach to the card front. Next using the HCD3-7445 Slim Star Lattice Rectangle Die cut both sections using the lattice and outline dies in white cardstock. This will create the background and center pieces of lattice as shown in the photo. Using the outline die only for the center piece, cut a piece of decorative paper from sheet 9B going vertically. Before gluing these together, use a hydra sponge and dries clear glue to apply glue to the white lattice areas and sprinkle the Rajni Chawla’s Crystal Clear glitter. Once all glittered, attach the large lattice piece directly to the card front and adhere the inner lattice piece to the vertical stripe piece of decorative paper. Now using 3D foam tape attach this center section to the card front. For the sentiment, stamp the “Happy Holidays” sentiment from the HCPC-3993 Holiday Star Cling Stamp Set onto white cardstock using Encore Gold Metallic Ink and heat emboss using Ranger Gold Embossing Powder. Die cut out using the smallest die from the HCD3-7433 Slim Line Lattice Oval Die Set. From this same die, also cut a piece from Sheet 7B and layer the two to create the sentiment. Attach to the card front.

Stamp the small poinsettia 3x from the HCPC-3957 Large Poinsettia Cling Stamp Set and the 2.5” poinsettia 4x from the HCPC-3958 Small Festive Poinsettia Cling Stamp Set, using the same gold heat embossing combination as above, onto white cardstock. Color using daubers and Red Geranium ink and die cut with coordinating dies. Shape using the matching 3D Mold and finish off by layering two flowers and adding gold stamens from the HCS1-459-2 Assorted Pearl Stamens Medium to the centers. Using the HCPC-3959 Holly Berry Spray Cling Stamp Set, stamp 4x onto Sea Foam Cardstock with Emerald Green Archival Ink. Stamp leaf 6x from the HCPC-3957 Large Festive Poinsettia Cling Stamp Set onto Sheet 8B using the same Gold Embossing combination as above. Die cut all remaining stamped images with the coordinating dies. Shape the leaves in the coordinating 3D mold.


To assemble the card begin by laying out the Holly Berry Sprays so that they frame the sentiment and trail up the left hand side of the card. Add the poinsettias with hot glue and then lastly add in the gold embossed leaves to finish the look. Decorate the inside of the card as desired.


  I hope you enjoyed that as much as I enjoyed creating it for each of you! Check out my personal project in the Heartfelt Creations Gallery to find out what products I used for this project. 

Also, please be sure to visit the Heartfelt Creations Blog to see all of the gorgeous projects created by the other amazing design team members.


Love, Melanie

Friday, November 25, 2022

Black Friday Special!!! ~ Poinsettia Elegance

Hi Friends,

I am super excited for today's BLACK FRIDAY release. You guys have asked for these and Heartfelt Creations has listened! We are debuting an entire collection of SLIM LINE dies. These are perfect for a quick and easy card or can be dressed to the max so they are perfect for everyone. Lets take a look....


Directions:

Cut a piece of white card stock to 8 x 9” and score in half at 4”. Using the second largest die from the HCD3-7431 Slim Eyelet Rectangle Die cut the card base making sure the top cutting edge of the die just barely hangs over the fold line, so it preserves the fold. Next from sheet 5B of the HCDP1-2141 Holiday Star Paper Collection cut one from the same die as the card base and attach to the card base. From sheet 12 B use the second largest die from HCD3-7432 Slim Basic Rectangle Die to cut the next layer and using the HCDA1-449 Stack & Store Daubers ink the edges with Deep Purple Archival Ink. Using set HCD3-7433 Slim Lattice Oval Die, cut both the large and small dies once from white cardstock and once from Luxe Silver cardstock and layer the silver slightly offset behind the white. Once adhered together glue the layered rectangle to the dark purple rectangle and attach to the card base with 3D foam tape. For the sentiment, discard the Luxe Silver center oval piece and stamp the white oval with a sentiment from the HCPC-3993 Holiday Star Cling Stamp Set and glue down the 2 piece sentiment dies to the center of the card as shown.

Stamp the small poinsettia 3x onto white cardstock, and the large leaf 5x onto pale green paper (from the Festive Poinsettia Paper Collection) using the HCPC-3957 Large Poinsettia Cling Stamp Set; stamp the 2.5” poinsettia 2x onto white cardstock from the HCPC-3958 Small Festive Poinsettia Cling Stamp Set, using Versacolor White Pigment Ink and heat emboss using silver embossing powder. Color the flowers using daubers and Blue Violet and Deep Purple Archival Inks. Die cut and shape with coordinating dies and the 3D Mold. Finish the flowers by adding silver stamens from the Assorted Bead Stamens Medium. Add Dries clear glue to 3 deep purple HCS1-490 Rose Hip Stamens Large, using a Hydra Sponge, and dip/roll around in the container of Rajni Chawla’s Crystal Clear Glitter. Once dry adhere flowers, leaves, and stamens to the front of the card using hot glue. Finish the inside of the card as desired.

  I hope you enjoyed that as much as I enjoyed creating it for each of you! Check out my personal project in the Heartfelt Creations Gallery to find out what products I used for this project. 

Also, please be sure to visit the Heartfelt Creations Blog to see all of the gorgeous projects created by the other amazing design team members.


Love, Melanie

Wednesday, November 16, 2022

Birthday Love ~ Friendship Rose Collection #2

Hi Friends,

Welcome back to my blog for my second card featuring the Friendship Rose Collection. With this card I did a little something different and used an embossing folder from my stash and lightly inked the background to give these beautiful heart dies the showcasing they deserve. Aren't they gorgeous dies? Lets take a look...


Cut a piece of white card stock to 7 x 10” and score in half at 5”. Using sheet 8B from the HCDP1-2145 Friendship Rose Paper Collection, cut a piece measuring 5 x 7” With a Hydra Sponge apply Dries Clear Glue to the edges and sprinkle with Lion's Mane Ultra Fine Transparent Glitter, once dry, attach to the card base. Cut a piece of white pearl cardstock to 4 3/4” x 6 3/4” and emboss with a floral embossing folder. Lightly sponge the flowers and leaves with Coastal Coral and Leaf Green Archival Inks. Attach this layer to the card front. Using the HCD2-7430 Decorative Heart Die take the two inner hearts and die cut the pearl cardstock 2x, Do the same with both sheet 8B and 10A from the Friendship Rose paper pad. (For the pearl cuts use the outer hearts and for the colored cuts use the inner hearts for this project) With the outline heart only, cut Luxe Silver Cardstock 2x and adhere to the back of the pearl hearts previously cut. Using sentiment stamps from HCPC-3843 Special Birthday Sentiments Cling Stamp Set and HCPC-3845 Just For You Sentiments Cling Stamp set stamp the center of the colored hearts with the coordinating ink color. ( Bright Tangelo and Leaf Green Archival Ink) Glue the small hearts to the center of the larger hearts.

Stamp the curved branch 2x from the HCPC-3949 Sweet Magnolia Buds Cling Stamp Set with Versa Color Pigment White Ink onto Rajni Chawla’s Vellum. Using HCDA1-449 Stack and Store Daubers color the back side of the vellum with Leaf Green and Bright Tangelo Archival Inks. Die cut using coordinated dies. Lightly hand shape on the back side with the Deluxe Flower Shaping Kit.

Adhere a string of pearls along the outer edge of the white pearl cardstock using the Dries Clear Glue. Attach the hearts to the card front as shown using foam dots for the lower heart and Double Dots 100pc - 3D Foam Circles for the top heart for extra height. Glue the Magnolia buds along side the hearts to complete the project.


I hope you enjoyed that as much as I enjoyed creating it for each of you! Check out my personal project in the Heartfelt Creations Gallery to find out what products I used for this project.

Also, please be sure to visit the Heartfelt Creations Blog to see all of the gorgeous projects created by the other amazing design team members.


Love, Melanie