When beginning to design this I wanted to play around with making my own patterned paper so I am using the "Heart Flower Background" stamp to do this with.
The stamp was stamped numerous times to create this background paper. I then colored it with Copic Markers that coordinate with the focal stamp. I absolutely love the way this all matches Tilda's dress and even the little flowers on the hedge hogs. Those are also available in the store and are called the "Hedgehog Kit"
Welcome Back! Today I am coming to you as part of the Magnolia-Licious Design Team. I am featuring a lot of products in this fun Non Traditional Christmas card.
I have numerous items in this card beginning with the Lemon Craft Christmas Carols 6x6 paper pad. Lemon Craft has beautiful papers and a lot have a vintage feel to them.
Tilda With Star is the focal here and she was really fun to color. I used Copic Markers in the following color combos.
I even added a second star covered in Glossy Accents. See below!
The star focal behind Tilda was made with the Christmas Star Doohickey Die. You cut the die 6 times and using the score lines you form an accordion style fold. Designer Tip: Use patterned paper and it comes together quite nicely. Make sure to use a quick drying glue like Tombow Liquid glue.
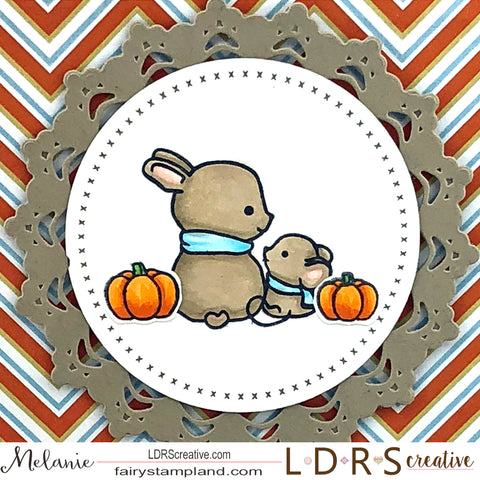
I am here today to share some cuteness with all of you! My newest project featuring the LDRS Creative "Happy Fall" Stamp set & 6x6" paper pack. These bunnies have taken a hold of my heart, they are so precious!
I have used numerous LDRS Creative items here including the following.
When I began to design this card, I knew I
wanted to do something to really show off this adorable bunny stamp. So
I decided to reach for my beloved LDRS Creative dies and chose the Holly Wreath Circle Die Set.
The inner circle die has a light cross stitch like border and is the
perfect size but I didn't want to create a holiday card so I switched
things up and decided to use the Dew Drop Circle Die
to layer behind the smaller circle which really helps showcase this
stamp. Look how perfect these all layer together. I really like being
able to use seasonal sets year round!
Lastly I stamped a bunch of pumpkins from the Happy Fall Stamp Set and fussy cut them out. Between the Happy fall paper and the pumpkins sprinkled everywhere it truly now feels like fall.
One last look..... here are some of the
yummy products I have used in my project. I hope this finds you smiling
and inspired. Melanie
Thank you for joining us on our LDRS Creative inspiration week blog hop! We are showcasing lots of gorgeous projects using products from our new release. You can even see them in action with step-by-step projects by our amazing designers on their blogs and our own LDRS Creative Youtube channel(make sure you subscribe)!
Simply use the list at the end of the post to keep hopping!
Each day we are giving away a $50 LDRS Creative gift card to one lucky hopper! To enter leave a comment on each blog in the hop, plus follow us on Facebook and Instagram. Winners will be announced on the LDRS Creative inspiration blog on September 4th.
AND for the release event we are excited to offer some great savings!
Save 15% on the new release* and use code HAPPYFALL
(*Coupon valid until midnight EST 9/1/18)
This is my 3rd personal card created for the LDRS Creative blog hop this week. Hasn't this been fun? I have used the brand new Peek-a-Boo style background die called "Autumn Breeze" I cut it from a dark brown card stock and then using foam tape I carefully added that to the back before attaching it to the dark blue card base. It really gives the card depth and dimension.
The stamp set I have used here is the brand new set called "Winds are Blowing". It was a joy to color.
The sentiment was made using one of the sentiments from the "Winds are Blowing" stamp set and I also added the little leaves from the "Happy Fall" stamp set. see this close up below. Such a cute addition don't you think?
Thank you for joining us on our LDRS Creative inspiration week blog hop! We are showcasing lots of gorgeous projects using products from our new release. You can even see them in action with step-by-step projects by our amazing designers on their blogs and our own LDRS Creative Youtube channel(make sure you subscribe)!
Simply use the list at the end of the post to keep hopping!
Each day we are giving away a $50 LDRS Creative gift card to one lucky hopper! To enter leave a comment on each blog in the hop, plus follow us on Facebook and Instagram. Winners will be announced on the LDRS Creative inspiration blog on September 4th.
AND for the release event we are excited to offer some great savings!
Save 15% on the new release* and use code HAPPYFALL
(*Coupon valid until midnight EST 9/1/18)
For my second project for the LDRS Creative New Release blog hop I decided to use the adorable "Happy Fall 6x6" paper stack" I then colored these two adorable critters from the Happy Fall Stamp set. Both of these items are Brand New!!!
Additionally I added the Scalloped Rectangle Die Set to create the white panel. I simply cut a piece of dark brown card stock to same size as the white panel so that the contrast would be behind the openings in the die. Then I cut the orange card stock just 1/8" larger than the white panel so mat around it and to allow it to pop off the card front. The sentiment here is also from the "Happy Fall Stamp set"
For the leaves in each of the corner I cut them from the Autumn Breeze Peek-A-Boo Die. I used some foam tape behind the critters as wellm to allow them to also pop. These little guys are so much fun to color!!!
Thank you for joining us on our LDRS Creative inspiration week blog hop! We are showcasing lots of gorgeous projects using products from our new release. You can even see them in action with step-by-step projects by our amazing designers on their blogs and our own LDRS Creative Youtube channel(make sure you subscribe)!
Simply use the list at the end of the post to keep hopping!
Each day we are giving away a $50 LDRS Creative gift card to one lucky hopper! To enter leave a comment on each blog in the hop, plus follow us on Facebook and Instagram. Winners will be announced on the LDRS Creative inspiration blog on September 4th.
AND for the release event we are excited to offer some great savings!
Save 15% on the new release* and use code HAPPYFALL
(*Coupon valid until midnight EST 9/1/18)
Here is my first personal blog hop post for the LDRS Creative's NEW Release... Make sure to hang out with us all three days... lots of inspirations and tutorials by each design team member. Below is my tutorial... scroll down to see it!!!
I have used a masking technique which is super easy. I first cut two strips of masking paper 1" wide and long enough to cover the height of the card plus a little which will help the card stay in place. See below.
If you look close you can see the masking paper is peeking out past the stencil on the top there. It is covering 1" on either side so that it remains white after we ink the stencil. Then the leaves stencil is held in place by some washi tape. Super simple!
Using our amazing Hybrid Ink and a blending tool I first added the Dan-D-Lion yellow Hybrid ink followed by In Your Face Orange Hybrid ink. These hybrid inks blend beautifully and using both the masking tape along with the washi tape nothing moved so you can add as much or as many colors as you would like.
Now for the fun part.... removing the masking tape to expose your crisp edges created by the masking paper. Next thing I did was add the sentiment using our Raven Black Hybrid ink and clear embossing powder. Next to show you how I created the full size leaves.
Using a positioning tool is not required but it does help. I stamped three of the leaves using Dan-D-Lion Hybrid ink. Then followed up using the coordinating stamps to give the leaves texture. For this step I used Olive Branch Hybrid ink and In Your Face Orange Hybrid inks. You can purchase the small Hybrid ink pads shown in the photos as a collection of four called Jewelry Beads and is also a newly released item. Trust me....you will love these inks!!!
Lastly I fussy cut the leaves and added inks to the edges using the blending tool. See below.
Aren't they beautiful???? I love them! Here is the final result....
Today I have a surprise for you. I have been slowly but surely learning how to create and edit YouTube videos. I wanted to share my coloring with all of you and thanks to being a design team member over at Club La-La Land Crafts I was able to muster up the courage to record not only one but 3 videos, which I will share below.
Today's projects are my second set of cards using the Club La-La Land Monthly Club Kit! isn't it just adorable? Want to join? Simply CLICK HERE.
My first project uses Happy Camper Marci along with the roasting marshmallow die set from this August kit along with the La-La Land Crafts Postage Stamp Dies.
Want to see how I colored Happy Camper Marci? I have created a 3 part video showing you the skin, hair, and clothing being colored with Copic markers. Take a look and don't forget to subscribe as I am brand new YouTuber ~ Thank you friends!
Copic Skin Tutorial
Copic Hair Tutorial
Copic Clothing Tutorial
My second project today is probably my favorite La-La Land Crafts project yet! Her hair color and her details on her clothes were so much fun. I added two products from the store in this project. Nested Circles Dies and Pierced Scalloped Circles
white gel pen was also used on her jacket and shorts.
Being a part of this team has allowed me to step out of my comfort zone and I feel like I have grown as an artist with each and every project. Many thanks goes out to Irina and the rest of the team. You girls have been amazing to work with.
Thank you for stopping by today. Please consider following my blog and/or YouTube channel. My goal is to inspire you to get your crafty supplies out and make something special!